How to Cover your Cornice Window Treatment as a Professional

To
make the front and sides, you will require using a sheet of 1/4 inch (6mm)
plywood. Your local timer merchant should cut this to size for you. The extra
cost is well worth the time and effort.
The fact
that I use this kind of pelmet stiffener is as it is quite cheap. It is very
strong while also being fairly light. Finally it is also good for stapling the
drapery fabrics to.
When
I make fabric covered window cornice I use a piece of scrap fabric to join the
main section of plywood to the end return pieces. This simply holds everything
together while you work.

Now I
have used a piece of fiber wadding to cover the front and sides as I make
cornice window treatment (you can use heavy curtain interlining). I placed the
plywood body onto the wadding and cut round it to get the shape. It is usually
slightly larger than the plywood.
Then
I took the plywood outside and placed it down with the fabric strips facing down.
Then using the spray adhesive I covered the cornice boards evenly.
I
then returned the plywood boards in doors and lay it on the table. Then taking
care I placed the fiber wadding onto the adhesive and pressed it down to stick
in place.
The
next step is to cut your drapery fabric ready for stapling onto the board. I
have cut the fabric about 2 inches wider than the cornice board on all sides.

In
the image above you can see that the drapery fabric has been turned over and
stapled down on all sides. You need to apply a little pressure to the fabric as
you staple to keep it taught and flat. However don't pull your fabric too much
as it will distort the look of the finished cornice.
Next
at the bottom I have started to lay the curtain lining fabric just over the bottom edge of the pelmet. This will cover
all the back of the cornice facial board
hiding the wood and staples making it look more finished.

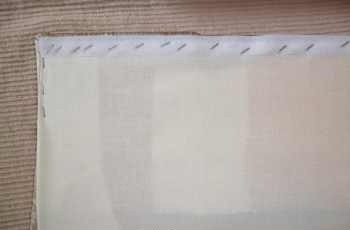
In
the image above you can see how I have placed the back tacking strip over the
edge of the curtain ling fabric. Then staple it into place all the way from one
end to the other.
Also
I have left some of the curtain lining fabric overlapping at the end. This was
done deliberately so we can make cornice which is neatly finished at the ends.

Next
I have folded over the surplus lining fabric on both ends of the window
treatment cornice. Then I folded the lining fabric up and over laying it covering
all the back of the pelmet board.
Next
I used my scissors to cut off the surplus lining fabric. This is anything lying
over the top of the pelmet board. I then stapled the top of the lining to the
top of the board. Smoothing the fabric out as I went a long.
You
only need to use a few staples widely spaced to hold it in place at this stage.
Also don't worry about the edge of the lining fabric not looking neat as you
will be covering it.

This
image here shows the lining fabric folded over and smoothed down prior to being
trimmed and staples down at the top.
You
can see how using the back tacking strip to make cornice window treatment
creates a neat finish to the bottom edge of the lining fabric on the back of
the pelmet board.
Here
we have the image of the finished pelmet facial board with a strip of velcro
tape running along the top of the cornice locking in the lining fabric.
I
have also added a few staples down the sides to hold in the ling fabric on the
ends. Don't worry about these as you won't see them when fitted over your
window.


0 comments:
Post a Comment