How to make curtains, curtains design, curtain needs, curtain styles

Showing posts with label Swags. Show all posts

Wednesday, October 21, 2015

Valances, Cornices, Swags (Swags)

Swags

Valances, Cornices, Swags (Swags)
A swag or draped valance should be made of a material that drapes easily, as it is a formal treatment. A silk or taffeta is good. It may be lined in the same fabric or in a contrasting color, as the lining will show in some folds. It is made in three sections, and it is best to start with the center section. Cut a straight piece of muslin the width of your window and 36 inches deep at the center. Curve the bottom gently so that it is wider than the top. Drape it on the valance board and tack it in place, or place it on a table and arrange the folds, tacking them down with pins. Study the effect; if you want a deeper drape, adjust it accordingly.

Sides for the swag are made by cutting a piece of fabric, widening it 4 inches on each side to its widest point and narrowing at the bottom, 30 inches from the center of the top width. Such a piece will make two sides. Cut a piece of lining of the same size and dimension as the drapery fabric and place the two fabrics, right side down, on it ready for sewing. Stitch all around the piece, but not across the top width. At this point, you will have a bag-like piece of fabric, coming to a point at the bottom but open at the top. Now, starting from the center of the top, the open part, cut the entire piece in half, down through the point. You now have two sides. All that remains to be done is to slip stitch the top portion closed, leaving what was the center of the larger piece open. Turn right side out, fold in the appropriate folds, and hang by tacking to the valance or cornice board. You can get varied effects depending on whether or not you wish to press your swag.
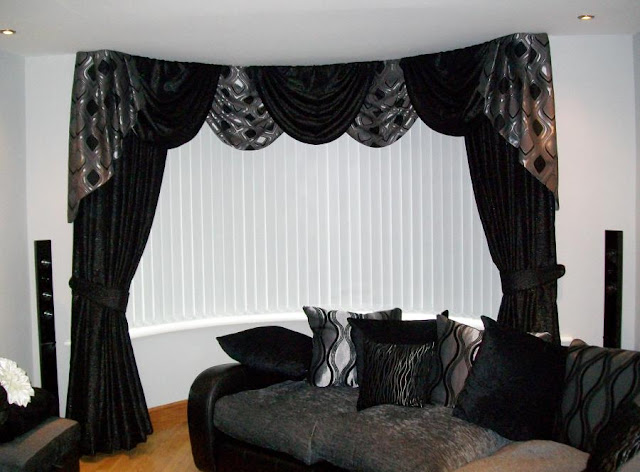
Valances, Cornices, Swags (Swags)
Trimmings for valances and swags, as well as for curtains and draperies, are available in a wide assortment of fabrics and styles. Your choice naturally depends on your curtain or drapery style, your fabric, and your room. As with valances, tassels, braid, fringe, and other elaborate forms only recently thought to show old-fashioned bad taste, trimmings have suddenly become high style in some quarters, and stiff valances with gold braid, applique in metallic thread, and fringe in bold colors are seen in many period rooms and, if anything, are even more ornate than in the past. In addition, you'll find such ambitious treatment as pleating of contrasting color shown under draped valances.

More conservative trimmings such as glazed chintz piping, coarse cotton-looped fringe, striped cotton braiding, and cotton ball trim are always good however and, in contrasting color, pick up and accent the lines of draperies and the colors of fabrics in much the same way that a black line will sharpen and improve a painting.


Wednesday, April 15, 2015

Valances, Cornices, Swags and that Built-in Look

Valances, Cornices, Swags and that Built-in Look
Today when a smooth, unified look is one of the things we expect from a good room, built-in bookcases, desks, and even furniture, are designed to suit it. We attempt to make furnishings seem so natural to the room that they are actually part of its architecture. Curtains and draperies help to achieve this smooth-flowing atmosphere, and when they too appear to be built in, the feeling is enhanced. Cornices and valances go a long way towards uniting the drapery with the wall, relating the window to the rest of the room.

They not only conceal the mechanics of the drapery operation, the rods and hooks, and the window frame itself (which is apt to be anything but ornamental in an older house or apartment), but they unite two or more windows, making them seem one large unit, and they can be used decoratively to echo a color or wallpaper or fabric pattern in the room. As they are, in a way, part of the architecture of the room, they must be used judiciously.

You can actually use your wall paper to cover a wood or metal cornice or valance board, or you can cover the boards with a correlated drapery material. Many firms are now producing wallpapers and fabrics in exact duplicates, and some fabric houses have groups of three correlated fabrics so that you can match your valance and drapery in complementary colors and weaves.

Other ideas include mounting a group of small framed prints or photographs on your valance; using stripes on a bias to match vertically striped draperies; using the expensive fabric you could not afford for draperies in your valances; covering them with the new wallpapers that simulate marble, brick, etc. If you make a hobby of finishing woods, you might give an interesting wood finish to a plain pine cornice.

You can buy unpainted hardwood cornices and valance boards at the hardware counter of the drapery section of your department store. Some stores even have assembled cornices with traverse rods installed.

If you buy a ready-made cornice, it is safest to get an adjustable one.

Valances, Cornices, Swags and that Built-in Look
Just to make things clear, valances, cornices and swags are variations of the same thing, the top finish of the window. A valance may be either hard or soft, depending on whether it hangs from a wooden board or not. When it is a curving piece of material with draped ends it is a swag, and when a swag is held at either corner by rings it is a festoon. A cornice is  usually a valance of straight rectangular shape with the board parallel to the window whereas the valance board is at right angles to the window like a shelf. Valances are often used to make a tall window seem shorter, and to make a high ceiling lower. Swags provide color contrast and interest to draperies without headings.

If you or your husband is at all handy with carpentry tools, it is simple enough to make your own cornice, however, since you need only nail together three boards, each about % inch thick. The two side boards will be about 6 inches long, the front board the width you wish the cornice to be. If you want to make your cornice adjustable, take 3 boards for the front piece, and nail them together with the center one on top, and overlapping the other two. To make the cornice shorter, increase the amount of overlapping. Decrease it to make it longer, pulling out the nails. Cornice brackets for attaching the cornice, or valance, to the wall, may be bought in hardware stores and many stores carry them. One part of the bracket plate is attached to the wall; the other to the cornice, and a screw fits through holes in each.  

Monday, May 21, 2012

What are Swag Valance Curtains?


What are Swag Valance Curtains?


As all of us know a valance is something that is located over furniture and other items to hide supports, clutter and so on. You can find a number of various types obtainable for instance balloon valance curtains and swag valance curtains. In our article today, we will focus on swag valance curtains and what we should do before buying them.

A regular valance is a piece of cloth that is positioned in a straight line. In the case of balloon valance curtains this is done with the intention of creating a fuller looking appearance. With swag valance curtains the swag refers to fabric that is draped over in a triangular style. This creates a different look than the kind of effect you would get with the normal, straight style of valance.

Many people are often fond of this fussy style as it helps to let in more light. It is often a good alternative for people who live in smaller homes and may not be able to have heavier drapes in their home. They can be placed either at the top or bottom of the curtains depending on what you feel is appropriate.

In order to make sure you order the correct swag valance curtains it is best to carefully measure the windows or the area that the windows will be in if a house is currently being built. You need to measure the width and twice the length of the window. This is because you need the material to be able to hang down the sides.

People generally associate swag valance curtains with a traditional look. Some websites may refer to this as a classic look. While this kind of design is very popular it is worth noting that this is not the only kind that is available to you. What you choose largely depends on what you think will provide the best effect in the room.

For instance you may desire to select prints of a distinct pattern. This can help the curtains to stand out more. Alternatively you may want a solid colour that matches the curtains or one that is different but compliments the shade of the curtains. Another factor that people often have to consider is what will be best suited to the furniture in the room as well.

The fabric you use can also make a difference when choosing swag valance curtains. Cotton is often a popular choice. This is mainly because it is a good quality material that is relatively cheap and relatively low maintenance. There are varieties for every room in the house, whether it is for the bathroom, kitchen or even for the kids in their bedroom.

There are various companies that offer swag valance curtains for sale. It is worth looking online for company directories so you can compare what is available and find the most suitable one for your interior needs. Customer reviews and feedback can help, as well as video demonstrations showing you where you may want to place them around your home to get the best possible effect in your room.

Sunday, May 20, 2012

The Fifth Great Way to Hang Your Scarf Swag Curtains


The Fifth Great Way to Hang Your Scarf Swag Curtains


This scarf swag idea is just really an adaptation of the second scarf swag type. It uses two scarf swags wrapped together to give you a more interesting look.

You start by following the same instructions as the second way.

Anyway you leave little more of the curtain rod uncovered between each swag wrap. This allows you to then wrap the second scarf swag in exactly the same way. I made the second swag shorter so it only reaches the ends of the rod on both side and does not hang down at the sides.

You can make both scarf swags the same size if you prefer. It is all a matter of personal preference. I hope you like these scarf swag ideas and will have a go at creating at least one for yourself.  They are a really great way to getting started in dressing your windows.


Friday, May 18, 2012

The Fourth Great Way to Hang Your Scarf Swag Curtains


The Fourth Great Way to Hang Your Scarf Swag Curtains


This style of scarf swag is hung using curtain hold back arms. This is just another way of creating a new look. It is also a very low cost way to dress a window.

This scarf swag also has a simple wrap over knot on each side to add a little more interest.

I have put a picture just below of the kind of curtain hardware you need to get this look.

For your swag you will need to measure between the hold back arms. Then measure down each side as far as you want the scarf to hang.


Then add these together and add another 6 inches for each wrap over knot. Not forgetting to add another couple of inches for hems.

You will need to install the curtain hold back arms at roughly a 45 degree angle as in the picture on the right.


You will need to hem all four sides of your scarf swag. You can sew this with a sewing machine or by hand with a needle and thread or even use hemming tape and a hot steam iron for a no sew finish.


Then you need to pleat the swag as above to create five pleats running the whole length of your scarf. An extra pair of hands is always useful for doing this.

Next hang your pleated scarf swag over the first curtain hold back arm. Letting it hang down the side as far as you want it to.


Then hang the other end over the other hold back arm so you get  the same look as the picture here.


Next to get the swag hanging in a nice shape. You will need to tease the pleats in to shape.


Simply pull the pleats a little at the sides starting with the top pleat and working down.

This will make the upper pleats rise upwards. Then you may need to tease the lower pleats down just a little as they may have moved up a little with the upper ones. This will give you the nice swag shape you see above.

To finish all you need to do is to wrap each side of your scarf around the hold back arm to create the wrap knot.


There you have it another scarf swag creation. Very simple but effective.

Wednesday, May 16, 2012

The Third Great Way to Hang Your Scarf Swag Curtains


The Third Great Way to Hang Your Scarf Swag Curtains


This scarf swag does not hang from a curtain rod. It hangs from metal swag holders. This allows us to add some extra features to our finished scarf swag.

These swag holders allow us to create the rosettes on both sides of the swag.

You will need to measure how much fabric to allow for creating your scarf.

So install your swag holders in place over your window. Then measure the distance between them. Then the distance down each side that you want the scarf swag to hang.


 Then add these two measurements together and add extra for the fabric needed to create each rosette.  This is an extra 16 inches for each rosette.

Next you need to start by hemming your piece of fabric. For this fabric I used hemming tape, the kind that fixes in place using a hot steam iron.


 Then as before you will need to pleat your scarf swag with five pleats as in the picture here.

Fold your scarf back and forwards to create the usual five pleats. The beginning and end of the fabric should fold back in the same direction.

To start hanging this style of scarf swag. Place the scarf over one of the swag holder. Allow the fabric to hang down the side as far as you want it to.


 Then hang the other end of the scarf over the other swag holder. You should end up with something looking like the picture to the right here.


 The next step is to create your rosettes. This is done by pulling the pleated fabric through the front to the swag holder as in the picture to the right here.


This can take a bit of effort depending on how thick your fabric is. I would recommend you use thinner fabrics or sheers for this kind of scarf swag.

When you have something that looks like the picture her.


 Then repeat this for the other swag holder. Now you are ready for dressing your main swag in to shape.

Start by pulling the fabric you have hanging through the front of the swag holders.


 You only want to pull it a little. You need to find the bit of fabric that makes the top two or three pleats move up as you pull.

If you repeat this on both sides of the swag, you will see the upper pleats rise upwards into the shape you can see in the picture above.

The next step is to dress the fabric in your rosettes. All you need to do is to spread out the pleats in the fabric. Then puff up the fabric a little to get the look you want.


 Repeat this process for both sides.

You should now have something that resembles the picture here.


 Once you have the rosettes dressed as you want. You may need to redo the dressing on the main swag. Teasing the top pleats up a little and teasing the bottom pleats down a little to get the swag shape you want.

You will almost certainly need to make some adjustment to the scarf hanging down the sides.


 You need to try and get the pleats to turn more to the front. I do this by grabbing hold of the pleats at the top and twisting them to the front. You may need to do this a couple of time to get it all hanging as you want. This is not an exact science and some fabrics seem to drape easier than others.


Sunday, February 19, 2012

Everything about Curtains

Everything about Curtains

Curtain Headings, Pelmets, Valances, Swags & Tails...

We recommend that all valances, pelmets and drapes are fitted to a ‘pelmet board’ or ‘top board’ and that the track is fitted to the underside of the board. Valance rails, especially plastic ones, are not strong enough to take the weight of much more than an unlined frill. Metal ones with velcro fix can be used for small valances but not pelmets or swag & tail treatments.


Pencil pleat tape
Tape is available in 1”, 3" & 6" versions. Tape can have a  velcro compatible loop section instead of the hook pockets.  A smaller size of tape, set down from the top of the valance gives a soft pie-crust frill, creating a very pretty look. (see animated image right)


Pinch Pleat, sometimes called Triple Pleat or French Heading
A classic heading, always smart; curtains fall in even folds, showing the pattern to its best advantage.
Add buttons or tufts for an eye-catching accent. The pleats can be made up to 10" deep and the general rule is the longer the curtains the deeper the pleats. 
Make the centre pleat in a contrast fabric, add a button & 
tassel, maybe contrast line as well - Show stopper !


Goblet Head
It can be made without buckram for a softer appearance and looks good with quite a large button at the base in contrast or smartly understated in self-colour.
Curtains look best hanging under a pole


 Contrast Lined Cut-Away Goblets
These are a variation where the inside of the goblet is lined in a contrast fabric and the front of the goblet is cut away to show the lining. The contrast button at the base finishes the effect.  Looks good as a curtain and is an excellent way on introducing colour to a valance in a room which doesn't have much height.


Spaced Shaped Double Bell
This valance is designed to be used with a dominant motif or pattern, the wide flat section showing off the pattern and the double pleated bell giving fullness.Contrast lining for the bell and a co-ordinating rope are shown here, but a frill at the base would change the look completely!


Swags & Tails
These in many variations but essentially two forms. Single swags, overlapped, or butted with a tail at either end to balance, or trapeze cut, where the swags are joined while flat and pleated up afterwards also with a tail at either end. Various small tails, jabots and tassels, rosettes & twiddly bits are used to decorate the joins.


Dropped Swag & Tail
An alternative is to use a dropped swag, either, as here against a fabric covered style 1 ply pelmet, or over a pole, several swags will give a `wrapped' effect.
Tails can be even or asymetric.


Ply Pelmets & Lambrequins
We make our hard pelmets on a ply base. Buckram can be used but we find that it curls and buckle with age.

With the current taste for a rather tailored look, we find ply is a better base. There are many designs for the shape of this type of pelmet, when choosing, consider how the fabric will fit into the shape as well as which shape will suit the window


It is a good idea to make a paper pattern and hang it ( blu-tack!) in the window, just to check how the sizes look; it is very common to make valances & pelmets too shallow!
A lambrequin is a pelmet that extends three quarters of the way down the side of the window  and gives a very smart tailored look which is used in conjunction with a blind. Particularly useful where there is no room for curtains but `just a blind' would look bleak and unfinished.  There are some new painted wood overpelmets especially for blinds - just gives them a finish if they are fitted outside the recess


Popular Posts

Powered by Blogger.