The First Great Way

This
is probably the simplest way to hang scarf swag. Draping your scarf over a
simple wooden curtain rod.
All
this requires other than a rod fitted over your window. Is a piece of fabric
the length you need to fit as you want it to.

I use
the width of the fabric as the scarf width. This is usually 54 inches wide. A
little more or less is fine.
Then
I measure the width of the curtain rod. Then down the sides as far down as you
want the swag to hang on each side. Then add these sizes together to get the
total length of the scarf.
Don't
forget to add a couple of inches for hems on to the length.
The
next step is to hem your scarf swag down all four sides. I have machine sewn
this piece of fabric. Then hand tacked the corners down. As they were too thick to sew on my sewing
machine.
You
could just as easily but slower have hand sewn the Hems. Another option would
be to use hemming tape and an hot steam iron. This would work for most fabrics to
hold your hems in place.
The
next step is to pleat your hemmed piece of fabric. This will give the swag its
shape when hanging.
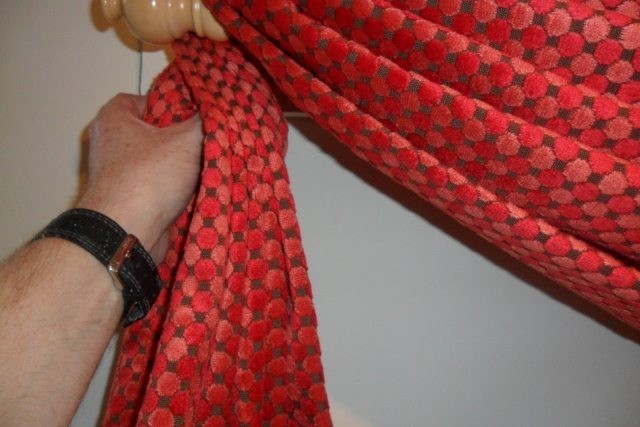
In
the picture to the right here you can see how the fabric is pleated back and
forth. You should end up with five pleats usually.

While
holding with one hand use the other to train the pleats down the fabric. It is
usually easier with two people one holding each end of the swag. Then you can
both pleat from each end.
Once
your swag is pleated hang one end over the end of the curtain rod. As in the
picture to the right. Then hook the
other end of the swag over the other end of your curtain rod. The picture below
shows the swag hung over the rod at both sides. Ready for being dressed into
its final finished shape.
So
far very simple and nothing very complicated. It continues that way in the
dressing of your scarf swag. This section is more about just teasing the swag
into the shape that you want.
To
start the final dressing of your scarf swag. You need to hold the top peat on the
scarf and pull it gently outwards. So the fabric mover down the sides.

When
you do this to both sides you will see the swag fabric rise up in the middle.
Next
repeat this process for each pleat in the fabric below. When you get to the
bottom pleat, you will probably see it does not hang down low enough to give
you the nice swag shape.
This
is because pulling up the other pleats above has caused the bottom pleats to
rise as well. So use one hand to hold the upper pleats in place.
Use
your other hand to pull done on the last couple of pleats. This will make the
swag curve deeper.
This
will give you nice evenly spaced pleats in your swag. Just like in the picture
just below.
Repeat
this process for both sides of your swag. Until you have it looking exactly as
you want.
Some
fabrics just seem to fall right almost straight away. Other fabrics seem to
take forever to look just right.
Like
everything else in life, practice make perfect.
Finally
the only thing left to do is to sort out the “tails”. The sides of our swag that
hang down each side of the window.
I do
this by getting hold of all the pleats at the top just under the curtain rod. Then
twist them a little to get the pleats facing more to the front. Again repeat this
for both sides.
There
you have it a finished scarf swag hung over a regular wood curtain rod.

With
lighter fabrics you may find they slip on the rod and pull the swag out of
shape. To cure this problem you will need to fix the scarf swag in place.
I use
either staples or thumb tacks pushed through the fabric and into the wooden
curtain rod. This fixes the scarf swag to the curtain rod so it can't move. You
won't usually see the fixings as they are right on top of the rod.


0 comments:
Post a Comment